One of the things the Raspberry Pi does great, is working as a HTPC.
For the ones who do not know what is Raspberry Pi, it’s a PC with a 700Mhz (overclockable to 900Mhz) ARM with Linux on it that cost as low as 25$. To learn more I suggest you to go look to the home page.
What I will describe here is how I put all together for my own HTPC
The pieces of my setup:
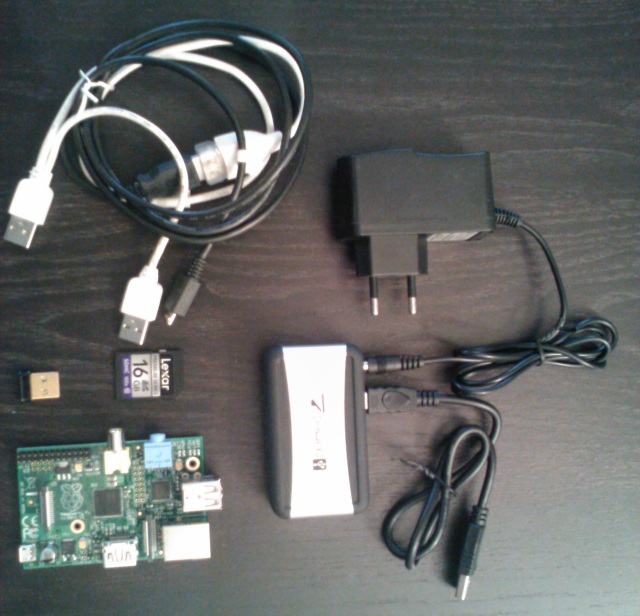
- RaspberryPi
- SD Card
- Powered usb hub
- External usb hard disk
- Edimax EW-7811UN Wireless nano usb adapter
What you will need (I did all the step using a windows machine)
- Win32diskImager
- OpenElec latest ISO image.
I tried both OpenElec and Raspbmc and ended up using the first. I chose OpenElec, because I found it to be a little bit faster in boot time and responsiveness of the XBMC (with confluence skin). The other thing is the wifi configuration with static IP more simple. In fact to configure the wifi with a static IP you will find the options in the “programs -> OpenElec configuration” while the Raspbmc at the moment use only DHCP, if you want a static IP you should change it via command line.
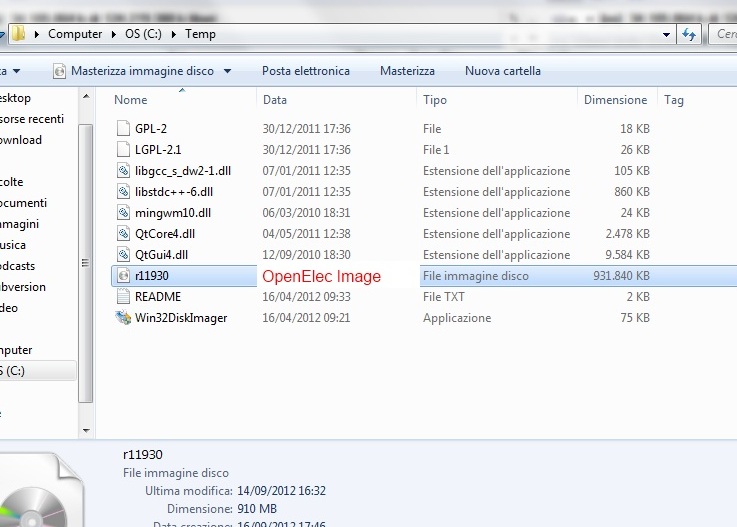
First of all we should get the OpenElec ISO to burn it on the card. On the main site you will not find them, but after a brief search on google I ended up on this site that keep the ISO up to date. So go grab the file (the one at the bottom of the page. For me the last one was r11930.img.zip).
Once you have your file, create a folder and extract both the win32DiskImager binaries and the ISO you just downloaded.
You should end up with something similar to this:
Now it is time to prepare the sdcard. Remember that the card will be wiped, so backup the data in it if before starting. If you prefer you can use SD formatter to completely erase your card.
Now launch Win32DiskImager and be sure to select the correct drive the host your card (1 in the image below).
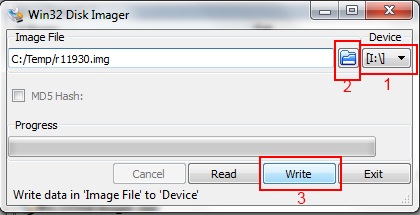
Then select the OpenElec image you extracted (2 in the image) and finally press the “write” button (3). After a bit it should say that everything went fine.
Before plugging the card in your Raspberry I will describe what I did with my setup. so you can do something similar or not.
First of all I don’t like many power supply around, so what I did was to get the power for my raspberry directly from the usb hub with a dual power male usb to micro usb adapter (like this one)
Then I connected the wifi dongle and my external HD.
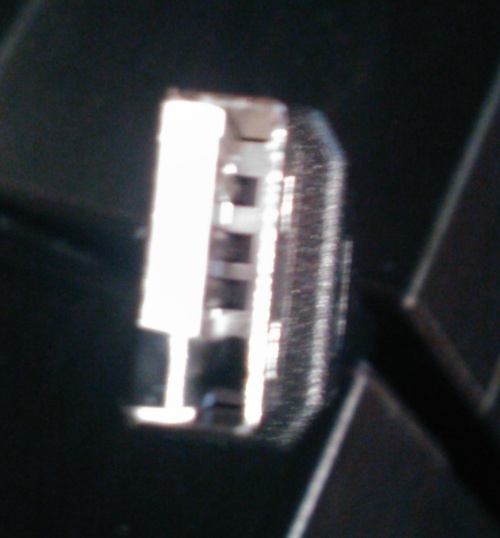
The first thing that happened was that nothing worked! Well the raspberry alone worked nicely, but not my final setup. I will spare you the description of all the experiments to understand what was wrong and I will go directly to the culprit. All the blame on the usb hub!. The problem is that the hub I purchased is poorly design and so the raspberry were back powered by the hub. To check if you have the same problem, connect only the the hub to your raspberry and power only the hub. If it’s back-powered it will boot and you can see the power led of the board on. Instead of changing hub and buy a new one I just did a little trick to cut out the power from the usb cable. I taped with PVC the 5v connector (pin 1). Here is a photo
Now everything works fine.
Here is my setup (still in beta). At the moment I am working on putting up a small case to host all the wiring and components.

These are all the pieces you can see in above picture

In the next post I will show you how to setup XBMC to use wifi with a static IP, so it is more easy to use with the remote app you will install in your mobile device.
UPDATE 16/11/2012
At this address, I found a nice website with a wider choice of images (up to 32GB) and also the FAT files updates so you don’t have to reformat everytime you update the openElec.